1.更新apt资源
sudo apt-get update
2.安装transmission
sudo apt install transmission
3.安装完成

debian8系统如何通过脚本一件安装宝塔?本教程以debian8系统为例
本配置适用于debian8,9版本
一、宝塔面板的系统要求
以下是宝塔官网对于 Linux VPS 的系统要求:
1、 操作系统要求:全新系统 (支持 CentOS、Ubuntu、Debian、Fedora、Deepin),确保是干净的操作系统,没有安装过其它环境带的 Apache/Nginx/php/MySQL。另外,宝塔 Linux6.0 版本是基于 CentOS7 开发的,强烈建议使用 centos7.x 系统
2、内存要求:内存要求最低 512MB,推荐 768MB 以上,纯面板约占系统 60MB 内存
二、一键安装宝塔面板教程
Debian 安装脚本:
wget -O install.sh http://download.bt.cn/install/install-ubuntu_6.0.sh && bash install.sh
等待安装即可
之后就是安装成功的提示了:

根据提供的登录链接、用户名和密码,就可以看到熟悉的宝塔面板了,这里可以非常方便的操作你的 Linux VPS,包括安装插件、上传文件、系统垃圾清理等:
1.更新apt资源
sudo apt-get update
2.安装libcurl3
sudo apt install munin
3.测试

Cordova 是用于使用HTML,CSS和JS构建移动应用的平台。那么在ubuntu18.04中如何安装cordova呢?本文给出详细说明。
1.首先更新软件列表
sudo apt-get update2.安装node.js和npm
sudo apt-get install nodejs

sudo apt-get install npm3.安装cordova
sudo npm install -g cordova4.查看cordova版本
cordova -v按y

安装完成
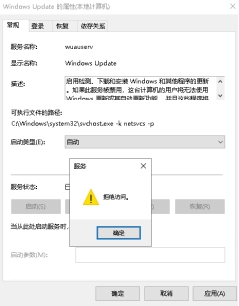 1.打开“运行”,输入`regedit`,点击“确定” 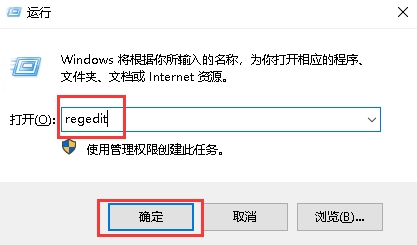 2.在HKEY_LOCAL_MACHINE\SYSTEM\CurrentControlSet\Services\wuauserv路径下右键点击“wuauserv”选择“权限” 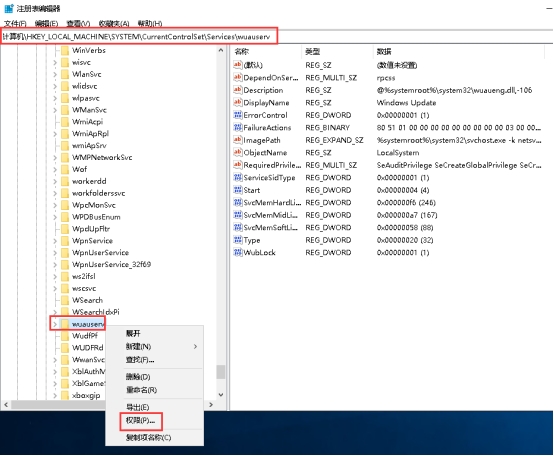 3.勾选“完全控制”的“允许”,点击“确定”即可 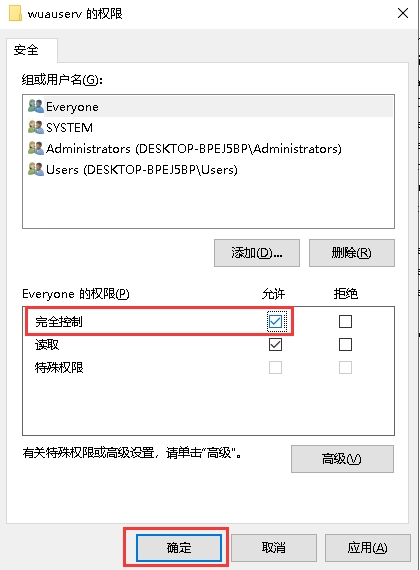
debian8系统如何编辑文件sources.list更换下载源?本教程以debian8系统为例
本配置适用于debian8,9版本
1.编辑sources.list文本
vi /etc/apt/sources.list可以把之前的文本源拷贝到其他地方或者前面打#号

这边我打#号处理
2.更换源文本到sources.list文件上
163镜像站
deb http://mirrors.163.com/debian/ stretch main non-free contrib
deb http://mirrors.163.com/debian/ stretch-updates main non-free contrib
deb http://mirrors.163.com/debian/ stretch-backports main non-free contrib
deb-src http://mirrors.163.com/debian/ stretch main non-free contrib
deb-src http://mirrors.163.com/debian/ stretch-updates main non-free contrib
deb-src http://mirrors.163.com/debian/ stretch-backports main non-free contrib
deb http://mirrors.163.com/debian-security/ stretch/updates main non-free contrib
deb-src http://mirrors.163.com/debian-security/ stretch/updates main non-free contrib
中科大镜像站
deb https://mirrors.ustc.edu.cn/debian/ stretch main contrib non-free
deb-src https://mirrors.ustc.edu.cn/debian/ stretch main contrib non-free
deb https://mirrors.ustc.edu.cn/debian/ stretch-updates main contrib non-free
deb-src https://mirrors.ustc.edu.cn/debian/ stretch-updates main contrib non-free
deb https://mirrors.ustc.edu.cn/debian/ stretch-backports main contrib non-free
deb-src https://mirrors.ustc.edu.cn/debian/ stretch-backports main contrib non-free
deb https://mirrors.ustc.edu.cn/debian-security/ stretch/updates main contrib non-free
deb-src https://mirrors.ustc.edu.cn/debian-security/ stretch/updates main contrib non-free
阿里云镜像站
deb http://mirrors.aliyun.com/debian/ stretch main non-free contrib
deb-src http://mirrors.aliyun.com/debian/ stretch main non-free contrib
deb http://mirrors.aliyun.com/debian-security stretch/updates main
deb-src http://mirrors.aliyun.com/debian-security stretch/updates main
deb http://mirrors.aliyun.com/debian/ stretch-updates main non-free contrib
deb-src http://mirrors.aliyun.com/debian/ stretch-updates main non-free contrib
deb http://mirrors.aliyun.com/debian/ stretch-backports main non-free contrib
deb-src http://mirrors.aliyun.com/debian/ stretch-backports main non-free contrib
华为镜像站
deb https://mirrors.huaweicloud.com/debian/ stretch main contrib non-free
deb-src https://mirrors.huaweicloud.com/debian/ stretch main contrib non-free
deb https://mirrors.huaweicloud.com/debian/ stretch-updates main contrib non-free
deb-src https://mirrors.huaweicloud.com/debian/ stretch-updates main contrib non-free
deb https://mirrors.huaweicloud.com/debian/ stretch-backports main contrib non-free
deb-src https://mirrors.huaweicloud.com/debian/ stretch-backports main contrib non-free
清华大学镜像站
deb https://mirrors.tuna.tsinghua.edu.cn/debian/ stretch main contrib non-free
deb-src https://mirrors.tuna.tsinghua.edu.cn/debian/ stretch main contrib non-free
deb https://mirrors.tuna.tsinghua.edu.cn/debian/ stretch-updates main contrib non-free
deb-src https://mirrors.tuna.tsinghua.edu.cn/debian/ stretch-updates main contrib non-free
deb https://mirrors.tuna.tsinghua.edu.cn/debian/ stretch-backports main contrib non-free
deb-src https://mirrors.tuna.tsinghua.edu.cn/debian/ stretch-backports main contrib non-free
deb https://mirrors.tuna.tsinghua.edu.cn/debian-security/ stretch/updates main contrib non-free
deb-src https://mirrors.tuna.tsinghua.edu.cn/debian-security/ stretch/updates main contrib non-free
兰州大学镜像站
deb http://mirror.lzu.edu.cn/debian stable main contrib non-free
deb-src http://mirror.lzu.edu.cn/debian stable main contrib non-free
deb http://mirror.lzu.edu.cn/debian stable-updates main contrib non-free
deb-src http://mirror.lzu.edu.cn/debian stable-updates main contrib non-free
deb http://mirror.lzu.edu.cn/debian/ stretch-backports main contrib non-free
deb-src http://mirror.lzu.edu.cn/debian/ stretch-backports main contrib non-free
deb http://mirror.lzu.edu.cn/debian-security/ stretch/updates main contrib non-free
deb-src http://mirror.lzu.edu.cn/debian-security/ stretch/updates main contrib non-free
上海交大镜像站
deb https://mirror.sjtu.edu.cn/debian/ stretch main contrib non-free
deb-src https://mirror.sjtu.edu.cn/debian/ stretch main contrib non-free
deb https://mirror.sjtu.edu.cn/debian/ stretch-updates main contrib non-free
deb-src https://mirror.sjtu.edu.cn/debian/ stretch-updates main contrib non-free
deb https://mirror.sjtu.edu.cn/debian/ stretch-backports main contrib non-free
deb-src https://mirror.sjtu.edu.cn/debian/ stretch-backports main contrib non-free
deb https://mirror.sjtu.edu.cn/debian-security/ stretch/updates main contrib non-free
deb-src https://mirror.sjtu.edu.cn/debian-security/ stretch/updates main contrib non-free
以上是各类源的文本
1.这边举例为163源替换上去

文件保存退出
2.更新源
apt-get update

即可更换成功
**简要描述:** - 本接口用于查询业务详情 **输入参数:** |参数名|必选|类型|说明| |:---- |:---|:----- |----- | | suid | 是 | string | 业务标识 | **输入示例:** - https://qg.net/api/physical-business/getDetail?suid=value **返回参数:** | 参数名 | 类型 | 说明 | |:----- |:-----|----- | | RequestId | string | 请求编号 | | Code | integer | 返回编号 | | Message | string | 返回内容 | | Data.Id | string | - | | Data.Type | string | 业务类型 | | Data.SuId | string | 业务标识 | | Data.Name | string | 自定义名称 | | Data.Nodeid | string | 节点ID | | Data.Specid | string | 规格ID | | Data.Brandid | string | 品牌ID | | Data.Lineid | string | 线路ID | | Data.Cabinetid | string | 机柜ID | | Data.Userid | string | 用户ID | | Data.Cpu | string | CPU参数 | | Data.Memory | string | 内存规格 | | Data.Disk | string | 硬盘规格 | | Data.Raid | string | RAID规格 | | Data.Unum | string | U数 | | Data.Power | string | 电源规格 | | Data.Bandwidth | string | 带宽数 | | Data.Defense | string | 防御值 | | Data.Ipnum | string | IP数 | | Data.System | string | 系统ID | | Data.Username | string | 系统用户名 | | Data.Runstate | string | 业务状态 | | Data.Actstate | string | 操作状态 | | Data.Remarks | string | 备注 | | Data.Buyremarks | string | 购买备注 | | Data.Orderno | string | 订单组ID | | Data.Price | string | 价格 | | Data.Renewchange | string | 续费改价 | | Data.Starttime | string | 业务开始时间 | | Data.Endtime | string | 业务到期时间 | | Data.Createdat | string | 业务创建时间 | | Data.Updatedat | string | 业务更新时间 | | Data.Deletedat | string | 业务删除时间 | **返回示例:** JSON格式 ``` { "Code": 200, "Message": null, "Data": { "Id": 34366, "Type": "lease", "Suid": "sssssaas", "Name": "", "Nodeid": 2, "Specid": 11, "Brandid": 115, "Lineid": 14, "Cabinetid": 1, "Userid": 460, "Cpu": "2*L5630(8核16线程)", "Memory": "16G", "Disk": "120G SSD", "Raid": "无", "Trusteemode": 0, "Unum": 0, "Power": "", "Bandwidth": "5", "Defense": "122", "Ipnum": 2, "System": 4, "Username": "root", "Password": "Abcd1234", "Runstate": 3, "Actstate": 13, "Remarks": "", "Buyremarks": "", "Orderno": 14870, "Price": "0.00", "Renewchange": 0, "Starttime": "2021-07-30 18:24:12", "Endtime": "2021-09-01 18:24:12", "Createdat": "2021-07-30 18:24:12", "Updatedat": "2021-10-09 16:55:19", "Deletedat": "2021-09-10 09:52:18", "Oldid": null, "Ip": "", "Lockreason": null, "Refundable": 1, "Refundablemeno": null, "Renewmemo": null, "Upgradeable": 1, "Assetnumber": null, "Bindmethod": "arp", "Ipmiip": "" }, "RequestId": "93796BAF-D9B6-B0D6-FEB1-F047ABA6039C" } ``` **错误码:** |错误码|说明| |:----- |:-----|:-----| | - | - | **备注** - 更多返回错误代码请看首页的错误代码描述
如何用runlevel命令显示当前系统运行等级呢?本文给出详细说明。 1.runlevel命令显示当前系统运行等级 runlevel  ****说明****:5代表系统当前运行在控制台模式。 运行级别0:系统停机状态,系统默认运行级别不能设为0,否则不能正常启动 运行级别1:单用户工作状态,root权限,用于系统维护,禁止远程登陆 运行级别2:多用户状态(没有NFS) 运行级别3:完全的多用户状态(有NFS),登陆后进入控制台命令行模式 运行级别4:系统未使用,保留 运行级别5:X11控制台,登陆后进入图形GUI模式 运行级别6:系统正常关闭并重启,默认运行级别不能设为6,否则不能正常启动
1.更新apt资源
sudo apt-get update
2.下载webuzo安装脚本
wget -N http://files.webuzo.com/install.sh
3.修改脚本运行权限
chmod 755 install.sh![]()
4.运行安装脚本,等待安装完成
./install.sh
1.更新apt资源
sudo apt-get update
2.下载unixbench脚本
wget http://teddysun.com/wp-content/uploads/unixbench.sh

3.为脚本添加执行权限
chmod +x unixbench.sh![]()
4.执行脚本
sudo bash ./unixbench.sh


