1.安装docker
curl -sSL https://get.daocloud.io/docker | sh2.运行docker服务
systemctl start docker3.创建mysql5.7容器
docker run -itd --name mysql5.7_test -p 3388:3306 -e MYSQL_ROOT_PASSWORD=passwd mysql:5.7

-p 3307:3306:映射容器服务的 3307 端口到宿主机的 3306 端口,外部主机可以直接通过 宿主机ip:3307 访问到 MySQL 的服务。

MYSQL_ROOT_PASSWORD=passwd:设置 MySQL 服务 root 用户的密码

mysql:5.7:所使用的mysql镜像文件
4.查看正在运行的容器
docker ps![]()
5.测试mysql数据库是否可以正常访问

拓扑如下图所示:

如上图所示,R1和R2相接为Area0,R2和R3相接为Area1,R3和R4相接为Area2。由于Area2与Area0直接隔着一个非骨干区域(Area1),无法相互传递路由信息,因此需要在R2和R3之间通过虚链路技术搭建一条逻辑通道,使两台ABR(区域边界路由器)之间可以直接传递路由信息(3类LSA)。具体配置如下:
R2:

interface Loopback0

ip address 2.2.2.2 255.255.255.255

exit

interface FastEthernet0/0

ip address 12.1.1.2 255.255.255.0

no sh

exit

interface FastEthernet0/1

ip address 23.1.1.2 255.255.255.0

no sh

exit

router ospf 1

router-id 2.2.2.2

area 1 virtual-link 3.3.3.3 //在R2和R3(ABR)之间,建立一条逻辑的连接通道

network 2.2.2.2 0.0.0.0 area 1

network 12.1.1.0 0.0.0.255 area 0

network 23.1.1.0 0.0.0.255 area 1

R3:

interface Loopback0

ip address 3.3.3.3 255.255.255.255

exit

interface FastEthernet0/0

ip address 34.1.1.3 255.255.255.0

no sh

exit

interface FastEthernet0/1

ip address 23.1.1.3 255.255.255.0

no sh

exit

router ospf 1

router-id 3.3.3.3

area 1 virtual-link 2.2.2.2

network 3.3.3.3 0.0.0.0 area 1

network 23.1.1.0 0.0.0.255 area 1

network 34.1.1.0 0.0.0.255 area 2拓扑如下:

要求:为TCP的报文设置出接口f1/0,为UDP设置出接口f2/0。
具体配置:
R2(config)#access-list 110 permit tcp any any

R2(config)#access-list 111 permit udp any any

R2(config)#route-map qgtest permit 10

R2(config-route-map)#match ip address 110

R2(config-route-map)#set interface f1/0

R2(config-route-map)#exit

R2(config)#route-map qgtest permit 20

R2(config-route-map)#match ip address 111

R2(config-route-map)#set interface f2/0

R2(config)#int f0/0

R2(config-if)#ip policy route-map qgtest
在使用电脑的时候,如果发现自己电脑的时间一直不准确, 为了能够使得时间准确,可以设置电脑自动网络同步系统时间,本文将针对此问题进行详细说明。
1.在Windows10系统,右键左下角的开始按钮,在弹出的菜单中点击“设置”菜单项。

2.接下来在打开的Windows设置窗口中,选择“时间和语言”。

3.在打开的Windows设置窗口中,点击左侧边栏的“日期和时间”,点击后把右侧的“自动设置时间”下面的开关设置为开即可。

方法二
1.在Windows10系统中,使用“WIN R”打开运行窗口输入control,然后回车打开控制面板。

2.我们打开Windows10的控制面板窗口,在窗口中找到“日期和时间”图标。

3.点击上面的“Internet时间”选项,然后点击“更改设置”。

4.这个时候就会打开Internet时间设置窗口,勾选“与Internet时间服务器同步”前面的复选框,最后点击“确定”就可以了。

青果网络致力于营造健康向上、和谐有序的网络环境,严禁用户利用本平台资源进行网络违法违规行为,对于出现违法违规行为的用户,青果网络坚决对其进行处罚以作警示,处罚情况如下:
| 产品业务 | 业务标识 | 违规内容 | 处理方式 |
| 云电脑 | smpyk4kzew | 涉黄 | 服务暂停 |
| 云电脑 | vvvtlvxc | 涉黄 | 服务暂停 |
| 云电脑 | nt2dn4mz | 涉黄 | 服务暂停 |
| 云电脑 | x8uuesdl | 涉黄 | 服务暂停 |
| 云电脑 | bbqbniqx1 | 涉黄 | 服务暂停 |
| 云电脑 | bbqbniqx2 | 涉黄 | 服务暂停 |
| 云电脑 | bbqbniqx3 | 涉黄 | 服务暂停 |
| 云电脑 | bbqbniqx4 | 涉黄 | 服务暂停 |
| 云电脑 | bbqbniqx5 | 涉黄 | 服务暂停 |
| 云电脑 | bbqbniqx6 | 涉黄 | 服务暂停 |
| 云电脑 | bbqbniqx7 | 涉黄 | 服务暂停 |
| 云电脑 | bbqbniqx8 | 涉黄 | 服务暂停 |
| 云电脑 | bbqbniqx9 | 涉黄 | 服务暂停 |
| 云电脑 | bbqbniqx10 | 涉黄 | 服务暂停 |
| 云电脑 | bbqbniqx11 | 涉黄 | 服务暂停 |
| 云电脑 | bbqbniqx12 | 涉黄 | 服务暂停 |
| 云电脑 | bbqbniqx13 | 涉黄 | 服务暂停 |
| 云电脑 | bbqbniqx14 | 涉黄 | 服务暂停 |
| 云电脑 | bbqbniqx15 | 涉黄 | 服务暂停 |
| 云电脑 | bbqbniqx16 | 涉黄 | 服务暂停 |
| 云电脑 | bbqbniqx17 | 涉黄 | 服务暂停 |
| 云电脑 | bbqbniqx18 | 涉黄 | 服务暂停 |
| 云电脑 | bbqbniqx19 | 涉黄 | 服务暂停 |
| 云电脑 | bbqbniqx20 | 涉黄 | 服务暂停 |
| 云电脑 | bbqbniqx21 | 涉黄 | 服务暂停 |
| 云电脑 | bbqbniqx22 | 涉黄 | 服务暂停 |
| 云电脑 | bbqbniqx23 | 涉黄 | 服务暂停 |
| 云电脑 | bbqbniqx24 | 涉黄 | 服务暂停 |
| 云电脑 | bbqbniqx25 | 涉黄 | 服务暂停 |
| 云电脑 | bbqbniqx26 | 涉黄 | 服务暂停 |
| 云电脑 | bbqbniqx27 | 涉黄 | 服务暂停 |
| 云电脑 | bbqbniqx28 | 涉黄 | 服务暂停 |
| 云电脑 | bbqbniqx29 | 涉黄 | 服务暂停 |
往期记录:
2023年6月:https://www.qg.net/doc/1994.html
2023年5月:https://www.qg.net/doc/1930.html
2023年4月:https://www.qg.net/doc/1892.html
2023年3月:https://www.qg.net/doc/1870.html
2023年2月:https://www.qg.net/doc/1832.html
2023年1月:https://www.qg.net/doc/1822.html
2022年12月:https://www.qg.net/doc/1811.html
2022年11月:https://www.qg.net/doc/1804.html
2022年10月:https://www.qg.net/doc/1786.html
2022年9月:https://www.qg.net/doc/1771.html
2022年8月:https://www.qg.net/doc/1744.html
2022年7月:https://www.qg.net/doc/205.html
2022年6月:https://www.qg.net/doc/1702.html
2022年5月:https://www.qg.net/doc/1623.html
2022年4月:https://www.qg.net/doc/1614.html
2022年3月:https://www.qg.net/doc/1587.html
2022年2月:https://www.qg.net/doc/1558.html
2022年1月:https://www.qg.net/doc/1556.html
2021年12月:https://www.qg.net/doc/1514.html
2021年11月:https://www.qg.net/doc/1509.html
2021年10月:https://www.qg.net/doc/1488.html
2021年9月:https://www.qg.net/doc/1467.html
2021年8月:https://www.qg.net/doc/1449.html
2021年7月:https://www.qg.net/doc/1421.html
2021年6月:https://www.qg.net/doc/429.html
2021年5月:https://www.qg.net/doc/388.html
2021年4月:https://www.qg.net/doc/354.html
2021年2-3月:https://www.qg.net/doc/337.html
2021年1月:https://www.qg.net/doc/293.html
2020年12月:https://www.qg.net/doc/283.html
2020年11月:https://www.qg.net/doc/247.html
2020年10月:https://www.qg.net/doc/247.html
2020年9月:https://www.qg.net/doc/239.html
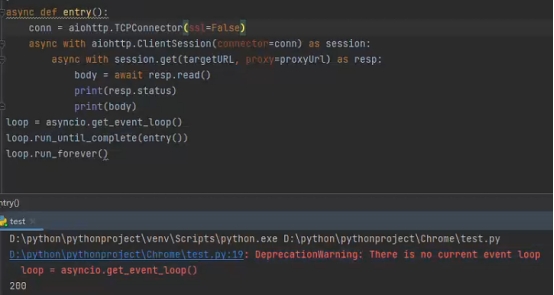 1.当python版本在3.10及更高版本时需要将loop = asyncio.get_event_loop()修改为loop = asyncio.new_event_loop() 即可 
拓扑如下图所示:

具体配置:
SW1:

int vlan 10

ip-subnet-vlan 1 ip 192.168.1.0 255.255.255.0

int vlan 20

ip-subnet-vlan 1 ip 192.168.2.0 255.255.255.0

nterface Ethernet0/0/1

port link-type trunk

port trunk allow-pass vlan 2 to 4094

interface Ethernet0/0/2

port link-type hybrid

port hybrid untagged vlan 2 to 4094

ip-subnet-vlan enable

interface Ethernet0/0/3

port link-type hybrid

port hybrid untagged vlan 2 to 4094

ip-subnet-vlan enable

SW2:

int vlan 10

ip-subnet-vlan 1 ip 192.168.1.0 255.255.255.0

int vlan 20

ip-subnet-vlan 1 ip 192.168.2.0 255.255.255.0

nterface Ethernet0/0/1

port link-type trunk

port trunk allow-pass vlan 2 to 4094

interface Ethernet0/0/2

port link-type hybrid

port hybrid untagged vlan 2 to 4094

ip-subnet-vlan enable

interface Ethernet0/0/3

port link-type hybrid

port hybrid untagged vlan 2 to 4094

ip-subnet-vlan enable1.更新yum源:`yum updte`  2.安装lftp:`yum install lftp` 
Lrzsz 是Linux服务器和window互传文件工具,lrzsz这个工具只适合传输小文件
1、安装lrzsz
yum install -y lrzsz
2、sz命令发送文件到本地
sz filename
输入命令后会弹出接受文件选择目录
sz 111

选择好路径后点击确定

这样就从linux下载文件成功了
3、rz命令本地上传文件到服务器:
# rz
执行该命令后,在弹出框中选择要上传的文件即可。


这样就从windows系统上传文件到linux系统成功了

拓扑如下图所示:

具体配置如下:
SW3:

先创建vlan10、20

vlan batch 10 20

然后在接口下划分trunk、access模式

interface Ethernet0/0/1

port link-type access

port default vlan 10

interface Ethernet0/0/2

port link-type access

port default vlan 20

interface Ethernet0/0/3

port link-type trunk

port trunk allow-pass vlan 10 20

interface Ethernet0/0/4

port link-type trunk

port trunk allow-pass vlan 10 20

配置mstp

stp mode mstp

stp region-configuration

region-name qgtest

instance 10 vlan 10

instance 20 vlan 20

active region-configuration

SW1:

先创建vlan10、20

vlan batch 10 20

配置链路聚合和trunk口

interface Eth-Trunk1

trunkport int g0/0/1

trunkport int g0/0/2

interface Eth-Trunk1

port link-type trunk

port trunk allow-pass vlan 10 20

interface GigabitEthernet0/0/3

port link-type trunk

port trunk allow-pass vlan 10 20

配置mstp

stp mode mstp

stp region-configuration

region-name qgtest

instance 10 vlan 10

instance 20 vlan 20

active region-configuration

stp instance 10 root primary

stp instance 20 root secondary

配置VRRP

interface Vlanif10

ip address 192.168.10.253 255.255.255.0

vrrp vrid 10 virtual-ip 192.168.10.254

vrrp vrid 10 priority 120

interface Vlanif20

ip address 192.168.20.252 255.255.255.0

vrrp vrid 20 virtual-ip 192.168.20.254

vrrp vrid 20 priority 100

SW2:

先创建vlan10、20

vlan batch 10 20

配置链路聚合和trunk口

interface Eth-Trunk1

trunkport int g0/0/1

trunkport int g0/0/2

interface Eth-Trunk1

port link-type trunk

port trunk allow-pass vlan 10 20

interface GigabitEthernet0/0/3

port link-type trunk

port trunk allow-pass vlan 10 20

配置mstp

stp mode mstp

stp region-configuration

region-name qgtest

instance 10 vlan 10

instance 20 vlan 20

active region-configuration

stp instance 20 root primary

stp instance 10 root secondary

配置VRRP

interface Vlanif20

ip address 192.168.20.253 255.255.255.0

vrrp vrid 20 virtual-ip 192.168.20.254

vrrp vrid 20 priority 120

interface Vlanif10

ip address 192.168.10.252 255.255.255.0

vrrp vrid 10 virtual-ip 192.168.10.254

vrrp vrid 10 priority 100备注:如果SW1有上行接口和上行链路时,其中一个发生故障,VRRP默认是无法感知的,即主备状态无法切换,数据包无法发送出去,这是就要用到track功能。具体配置如下:
SW1/SW2:

vrrp 10 track int g0/0/3 reduced 30假设G0/0/3为上行口,配置完这条命令之后,即当上行链路发生故障时,其优先级减少30,然后当前优先级小于Backup状态的三层交换机,则主备状态发生切换。


